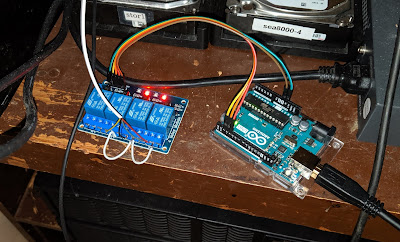
I recently completed another piece of my homemade home automation project. The thermostat in my house was a cheap POS with buttons that were hard to press, and didn't seem to maintain the temperature very well. I thought of maybe installing a Nest thermostat or something, but that wouldn't really give me the level of control I wanted. Luckily, thanks to this Technology Connections video, I knew that wiring my own thermostat would not be difficult.
I initially considered mounting a Raspberry Pi on the wall where the thermostat is, but getting power to it would be tricky, and finding a nice-looking wall-mount enclosure that could contain both the Pi and a relay board would be tricky. I realized I didn't need to do that, though - my server is already downstairs in the same room as the furnace, so I can just run another control cable from the furnace over to my server. I connected it to a relay board, which is connected to an Arduino plugged into my server. The Arduino is essentially only used to provide GPIO, and has a safety cutoff to turn the furnace/AC off if it doesn't receive a command at least once every 3 seconds.
Of course, being able to turn the AC on and off is pointless without being able to measure the temperature, so I need a digital thermometer as well. Connecting it to the server downstairs is not a good idea, because it's always cooler downstairs than upstairs due to simple physics. That wasn't a difficult problem to solve, though - I already had a thermometer connected to an Arduino upstairs which is plugged into the desktop in the living room. That one was actually my first major Arduino project years ago, to control my window-mounted AC in my room at my dad's house. It has a connection for a DS18B20 digital thermometer, and a group of IR LEDs to send the Cool/Fan only remote commands to the AC unit. When I moved into this house, I put it in the living room so it could control my living room TV instead. All I needed was a way to get the temperature from the desktop to the server, which just involves a script reading from the Arduino and sending the temperature over the network.
 |
| The no-nonsense web UI |
To control the thermostat, I need some kind of interface. I decided a basic web UI would be the easiest way to make it work on both my desktop, my phone, and my boyfriend's phone. I created a very simple API to get the current temperature and control the thermostat, then created a static HTML page with minimal Javascript to create the UI seen above. Since I didn't have to worry about users with obsolete browsers, I don't have to bloat it with compatibility libraries or gigantic frameworks, I can just use modern ES7 code without nightmares of bug reports from IE6 users.
I also created a script that would read the thermostat logs and produce a graph of when the AC or heater was running, and calculate the duty cycle hour-by-hour to show how close to capacity it's running. Each hash mark represents one minute that the AC was running on this particular day. The numbers to the right indicate the minimum and maximum thermostat setting for that hour, and the last number is the duty cycle percentage.
So far, it's worked pretty well (that is, as long as the AC compressor doesn't crap out). I'm one step closer to automating my whole house without relying on a store-bought solution.


No comments:
Post a Comment